|
||||||||||||||||||
|
#61 | |||
|
Fan Forum Hero
Joined: Apr 2014
Posts: 69,249
|
Great tutorial for the GIFs! Thanks for that!
") |
|||

|
Reply With Quote |
|
#62 | |||
|
Master Fan
 Joined: Mar 2015
Posts: 16,855
|
So, Millie Mae asked me if I had some tutorials on how to add a gif image into a still image. Since the tutorials I found on the internet aren't all that clear (and often for older versions of photoshop), I decided to make one myself
") I posted it on my thread, but figured I could just as well post it here as well I posted it on my thread, but figured I could just as well post it here as well  ------------- Some of these steps might be a bit double if you're already familiar with working on GIFs in photoshop, but I put them in anyway for the people less familiar with photoshop I use Photoshop CC, but it works for CS6 as well (not exactly sure about older version though). -------------- Add a GIF to a still image Click thumbnails for full sized images! 1. Open your .psd file (the still image), or make one and save it as .psd. 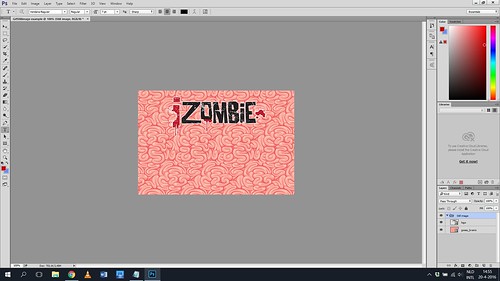 2. Open your .gif file (the moving image) in another window. 3. Go to Window > Timeline and turn the Timeline on.   4. Hit 'create frame animation' in your psd file window. 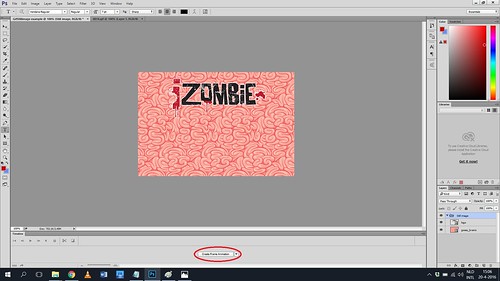 5. Select all frame of the GIF-file on the timeline and copy them. 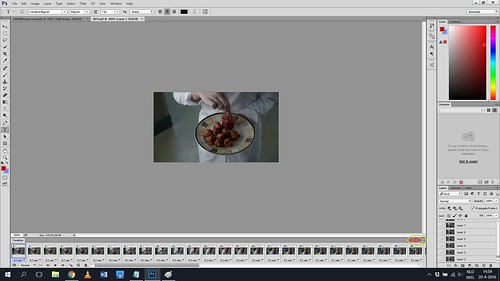 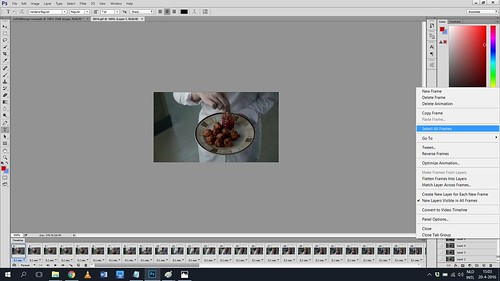 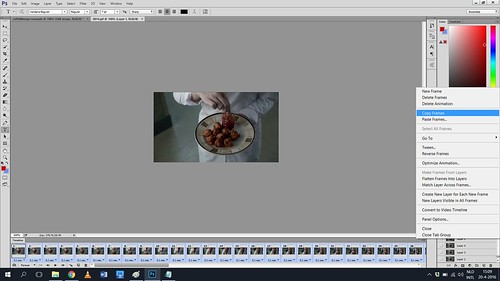 6. Go to the window where your psd file is, and paste the frame (please note: select 'paste over selection' as your paste method, and make sure 'Link added layers' is selected!) 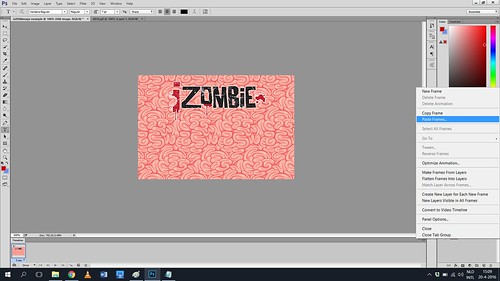 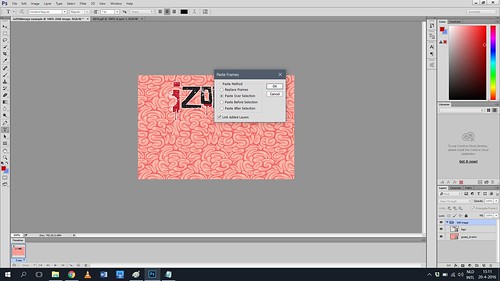 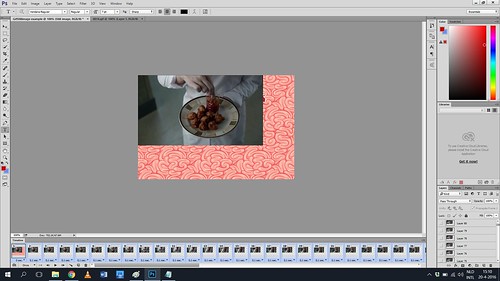 7. Select your still image layer(s). Click the 'timeline menu' and select 'Match layers across frames', leaving all options checked.  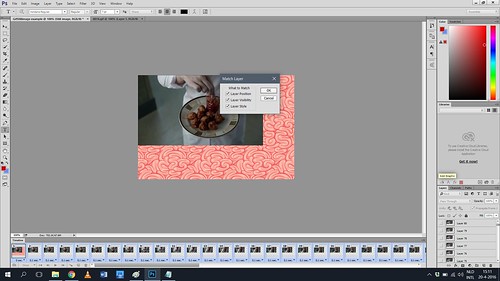  8. Now you can place/resize/edit the gif to your liking. (Tip: I usually put all the gif layers into one folder. That makes it easier to use adjustment layers and masks etc. on all gif layers at once!) 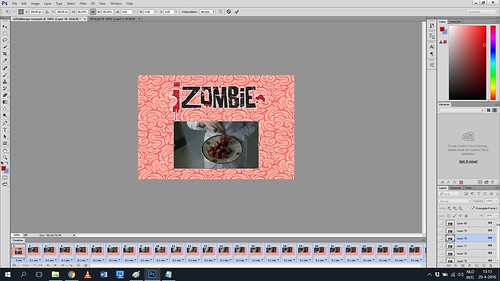 Tip: 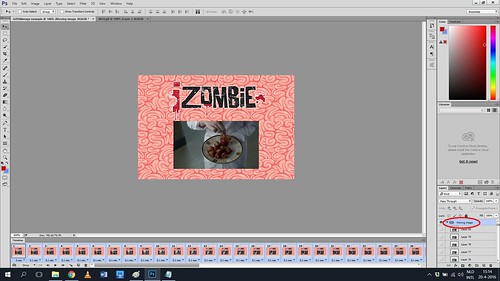 Examples of ways to edit the gif over the still image:  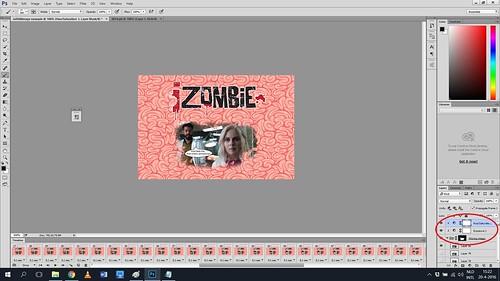 9. When you're finished editing your graphic, go to File > Export > Save for web (Legacy) (Photoshop CC) or File > Save for web (CS6) to save the image as a .GIF. End result:  ------------------------- Hope this is all clear  If you have any more questions, please ask If you have any more questions, please ask __________________
M a s c h a ✌
❝ Deceive yourself by yielding to soft words that cause no pain | Enrich yourself with different views learned without disdain ❞ εïз |
|||
|
|
Reply With Quote |
|
#63 | |||
|
Moderator Manager
Avatars Manager  |
Thank you so much for the tutorial, Mascha!
 __________________
"Save who you can save." |
|||
|
|
Reply With Quote |
|
#64 | |||
|
Master Fan
Joined: Mar 2015
Posts: 16,855
|
Thanks
 Hope it's helpful to anyone working with gifs in photoshop! Hope it's helpful to anyone working with gifs in photoshop!__________________
M a s c h a ✌
❝ Deceive yourself by yielding to soft words that cause no pain | Enrich yourself with different views learned without disdain ❞ εïз |
|||
|
|
Reply With Quote |
|
#65 | |||
|
Fan Forum Hero
Joined: Apr 2014
Posts: 69,249
|
That's amazing, thanks for taking the time to do that Mascha!
|
|||
|
|
Reply With Quote |
|
#66 | |||
|
Fan Forum Star
 |
ok so i made my first tutorial, it's how to make a gif in photoshop and it's very simple:
 i. open up photoshop ii. once photoshop is open go file > import > video frames to layers iii. a file window will open, choose the video you would want to gif. iv. after you have chosen your video, another window will open. this window is shown below. for music videos i put limit to two frames and for tv shows i put limit to four frames. 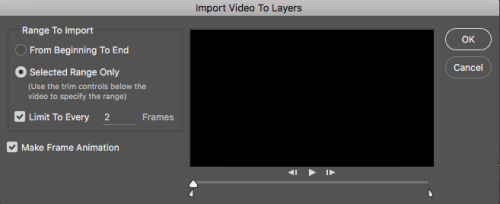 v. now you delete the caps that are shown in timeline and layers panel that you don’t want. a tip is that you go to the frame that you want to keep on the layers panel and delete the gifs before or after that on the timeline. both are shown below. timeline; 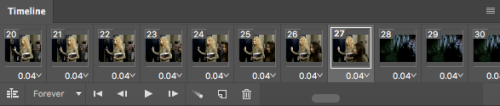 layers; 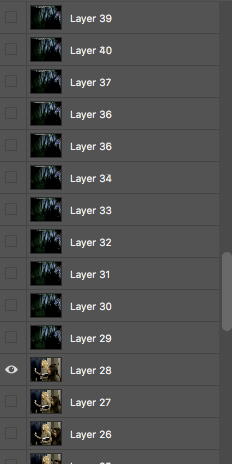 *notice how the eye is on the last gif that i want to keep in the layers panel, so for example i want to delete the caps after the eye. also delete the caps you don’t want from the timeline. vi. after you have deleted the caps that you don’t want go to select all frames, it’s found in the timeline, it’s the symbol that’s =. vii. after you have selected all frames, click on the time of the gif and select the speed you want your gif (i always go for 0.2 seconds) viii. now you resize your gif, to do this go to image > image size. make sure the image is on pixels, you then can choose the width and height of your gif. (i use perfect resize 9 suite when resizing icons. it’s really expensive, but worth while if you are annoyed by the way photoshop ruins photo’s when resizing. it does offer a thirty day free trial.) iv. add a psd file to your gif if you want, there are plenty online. v. now you can save you gif that you have created. to do this go to file > export > save for web. make sure your present is on one of the gif settings, i always save the original. which you can see when you select the 4 - up. __________________
"i promise that'll you never find another like me" taylor swift |
|||
|
|
Reply With Quote |
|
#67 | |||
|
Moderator Manager
Avatars Manager |
Thanks for sharing the tutorial!
__________________
"Save who you can save." |
|||
|
|
Reply With Quote |
|
#68 | |||
|
Fan Forum Hero
Joined: Apr 2014
Posts: 69,249
|
That's amazing, thanks for that!
 |
|||
|
|
Reply With Quote |
|
#69 | |||
|
Fan Forum Star
|
you're welcome guys.
__________________
"i promise that'll you never find another like me" taylor swift |
|||
|
|
Reply With Quote |
|
#70 | |||
|
Fan Forum Hero
Joined: Apr 2014
Posts: 69,249
|
I have a bookmark folder where I save the posts for all the Tutorials!
|
|||
|
|
Reply With Quote |
|
#71 | |||
|
Moderator Manager
Avatars Manager |
^ yeah, the tutorials are really handy
__________________
"Save who you can save." |
|||
|
|
Reply With Quote |
|
#72 | |||
|
Fan Forum Hero
Joined: Apr 2014
Posts: 69,249
|
Or I miss a step and have to refer back to it!
 |
|||
|
|
Reply With Quote |
|
#73 | |||
|
Fan Forum Star
Joined: Mar 2008
Posts: 154,230
|
I do the same, Millie.
__________________
→ 2024, bring it! |
|||
|
|
Reply With Quote |
|
#74 | |||
|
Fan Forum Hero
Joined: Apr 2014
Posts: 69,249
|
I just wish I had the patience to make Tutorials as I learn new things to keep for myself you know?
|
|||
|
|
Reply With Quote |
|
#75 | |||
|
Elite Fan
Joined: May 2016
Posts: 26,455
|
How did I not know about this thread ????
  love it!!! So I was going to make a gif in still image explanation, but the post above gif in image tutorial is very good. If anyone has only the old version of PS (CS2), I can help with the Image Ready steps for the functions that do not exist or do not work the same way in the old ps __________________
|
|||
|
|
Reply With Quote |
  |
| Bookmarks |
| Tags |
| fan art , fan art board , icon , picture |
| Forum Affiliates | |
| Thread Tools | |
|
|


